Thursday, April 25, 2019

5th Graders @oakhills194 Learn Tinkercad Design & Print With The OHE 3D Printer


Over the last several weeks, I began introducing Tinkercad to our 5th graders, giving students an opportunity to design in Tinkercad and print with the 3D printer.  This is our second year with a 3D printer (Makerbot Replicator+) at our building, thanks to our PTO! This year, our work has gone a little more smoothly than last year as I have mastered my own learning curve.  I created an introduction slideshow to kickoff our unit, teach a few basic concepts about the potential uses of 3D printers in the world, and demo the “how to” of basic cad design.  (positive and negative space, grouping, aligning, print bed) Not only does this unit align well with math and geometry, it promotes design and creative thinking. Students also get more experience with the soft skills of perseverance and problem solving with the maker cycle:


Time working with Tinkercad and students has taught me that there are a few things we have to manage. I have to make sure students don’t grab designs that are already designed within Tinkercad. Though this crowdsourcing option in Tinkercad is fabulous once students understand how the design tools work, it can short change them initially by not forcing them to use the tools to create their own design. Once student have their own creation, I go through each design looking for common mistakes like accidentally pulling the design above the print bed and creating areas that are too thin for the 3D printer to successfully print. (nothing below 2-3 mm) These are things I had to learn from trial and error by working with students last year. Happily our students are gaining valuable experience that will help them as creators and designers!

Friday, April 19, 2019

The Winners of the Oak Hills March Madness 2019 Tournament of Books!


We had two winners of our 2019 March Madness Tournament of Books, announced in the beginning of April!  These students were so proud of their perfect brackets!  They each won a book of their choice from the OHE BOGO Scholastic Book Fair in May.  The school's winning book/play this year was Harry Potter and the Cursed Child.  

Monday, April 8, 2019

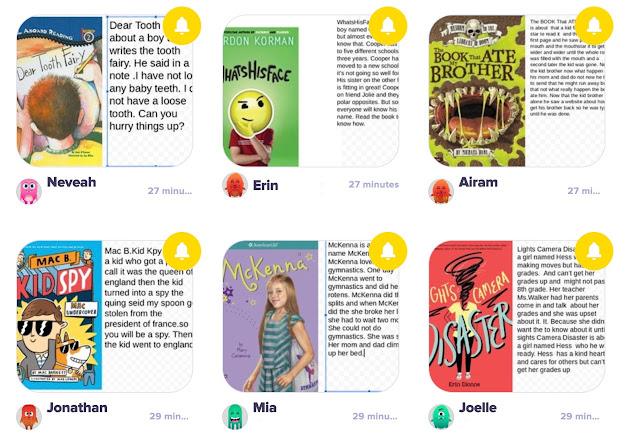
Mrs. Lorenson's 3rd Graders Create Digital Book Hooks & Share Using ClassDojo


Mrs. Lorenson wanted to get her students writing or journalling more regularly, so she asked me to suggest a digital tool that would provide her students with an easy way to write about their books.  She had several requests for this routine writing activity. She wanted student to be able to use an image of the book cover in addition to writing a summary. Finally, she wanted the final products to be shared on ClassDojo so all of the students and parents could read the book hooks! Because our students are used to logging into their district provided Google account, I thought using something from the Google suite might be easiest. This would also give students much needed practice with word processing.  We decided to use Google Drawing with a text box for the summary/book hook.  This web app should provide Mrs. Lorenson's class with some good writing opportunities, while creating a nice finished product.  I also taught students how to take a screenshot on their Chromebooks (control+shift+the window switch key). Once they had their book hook saved as an image, they were able to easily upload it to their ClassDojo account. This allowed them to read each other's book hook and share with parents.

Mrs. Lorenson's students will be doing these frequently, so that will give me the opportunity to suggest improvements.  I didn't have students add color to the background. As a result, you can see the checkerboard background of Google Drawing.  This is easily fixed moving forward by simply adding color.


Friday, April 5, 2019

3rd Graders Make Connections To Content & Each Other As They Study Ancient Egypt With Thinglink...


Recently, Mrs. Pettis asked for my help in selecting a digital tool that would allow students to gather information about topics from Ancient Egypt. She uses a teaching technique called the "jigsaw method" where students research and create sharable content around a single topic from a larger body of information. Once each student finishes, they are responsible for teaching the rest of the class about their single topic area thus giving every child the opportunity to gain information about the entire topic, in this instance, Ancient Egypt. (family life, structures, food, clothing, government, farming etc.)

Mrs. Pettis and I considered a few digital tool options, but in the end, Thinglink seemed to fit the requirements best.  Thinglink allows students to add information (text, web pages and online videos) to a single image making it highly interactive.  When a cursor passes over a bullet on the image, the content appears. (Check out the student Thinglink image above!)

Before we began, we set up Mrs. Pettis with a class in Thinglink, which created a code for students to join her class.  It only took a few minutes, but made things go smoothly when we introduced it to her students for the first time.


The end result was an attractive and sharable image loaded with content for students to explore. It was an excellent way for students to share their knowledge so others could learn the content as well.  

Thursday, April 4, 2019

1st Graders Use Seesaw to Demonstrate Their Learning Across The Curriculum!


Our 1st Graders have been hard at work using their iPads in math, reading and social studies!  The students are so accustom to using Seesaw that it has become a seamless part of the daily classroom experience.  Students used their iPads to document their work with coins in math, word sort in reading and they finished a map project using iMovie. They were able to share their work using Seesaw.


3rd Graders Share Facts About Their Favorite Greek Philosopher With Apple Clips!


As Mrs. McCollough's 3rd grade class came to the end of their unit on Ancient Greece, she wanted students to have an opportunity to share their learning about famous Greek philosophers. Since her students had never tried Apple Clips before, it seemed like the perfect opportunity to try it! Before I arrived for our Clips lesson, each student selected one of the Greek philosophers from their unit. Mrs. McCollough had them write down a few fact that they enjoyed most about their selected philosopher.  Once I arrived, students used Google images to select and save several images of their philosopher. (We did have a shared laugh when students searched for statues and painting of Homer and found Homer Simpson images :)

On a side note, though worthwhile, searching Google images is always a little risky for several reasons.  There is no 100% full proof way to insure that something inappropriate won't slip through. It is rare, but it does happen. Our district filters internet usage. Our iPads are set up with restrictions that help reduce problematic search results. On our Chromebooks, we use Google's "SafeSearch" option.  No matter what device we use, image searching becomes an excellent teachable moment to discuss appropriate use and search strategies before students begin their searching.  Without these opportunities to teach safe search strategies, we leave our students unprepared for the possible moments when they do stumble across things we prefer them avoid.

Another issue I like to address is the use of copyrighted material. Google also helps with this on our Chromebooks! Using the Image "Tools" option students can select usage rights to avoid using images that have copyright protection.


Back to our Greek Philosopher lesson with Clips...Once students had their images, I introduced them to the Apple Clips apps. Students didn't need much instruction as this app's interface is quite intuitive.  Once they knew to hold down the pink button inside the app while they talk, students were ready to go!  Students used their image library, video camera, posters, effects with stickers and live titles.


The lesson with Clips went smoothly.  There was one area that I will do differently when I teach with Clips again.  Next time I will show students how to edit the text of their "Live Titles" before they begin recording their speaking parts.  I showed students how to turn on Live Titles and just like all speech to text options, there were occasional misinterpretations on what was being spoken.  Students quickly got agitated when their live titles weren't correct.  Since editing the text is easy, I would recommend showing the editing option before they start recording. 

These 3rd graders loved using Clips and were proud of the results! It was quick and easy! I can't wait to try this again!